Tuesday, June 16, 2015

Working with Linked Servers

By creating a linked server, you can work with data from multiple sources.
Capabilities in Linked Server
·        Distributed queries can be run against this server.
·         Queries can join tables from more than one data source.
·         If the linked server is defined as an instance of SQL Server, remote stored procedures can be executed.
Permission
When using Management Studio requires CONTROL SERVER permission or membership in the sysadmin fixed server role.

To create Linked Server use any of the following:
•         SQL Server Management Studio
•          Transact-SQL

Steps

 In SQL Server Management Studio, open Object Explorer, expand Server Objects, right-click Linked Servers, and then click New Linked Server.   


The “New Linked Server” Dialog appears. Type the name of the instance of SQL Server that you area linking to.
[Server type]: Select [SQL Server] Option


Go to [Security] page, select [be made using this security context] option and set parameters
          Remote Login: sa

          Password:**********


Test your connection finally


Testing example to get Nintex WF Instance Name

Nintex Test WF is in my local Server ‘WSS_Content_NintexKidde’. So I have update Instance Id and Instance        Name to the Local DB table ‘Customer’.

I have connect to lenel Server using Linked Servers access Nintex DB there.


Finally I retrieve WF Instance Name from the Local Server of specific Instance WorkflowID in Nintex Server DB.


Friday, April 24, 2015

Custom Report generation in Nintex Workflow

Step 1.  First create the sample InfoPath Form which you need to insert data to the SQL DB.


Step 2.  Then create a Nintex Workflow to insert data to the Table in the DB.


This is the Table to save data.


Step 3. Create the .xml for our report format.

<?xml version="1.0" encoding="utf-8"?>
  <ReportDefinition xmlns:xsi="http://www.w3.org/2001/XMLSchema-instance" 
  xmlns:xsd="http://www.w3.org/2001/XMLSchema">
     <AllowCaching>true</AllowCaching>
     <CacheTimeOut>60</CacheTimeOut>
     <SqlQuery>GetAllCustomerDetails</SqlQuery>
     <QueryType>StoredProcedure</QueryType>
     <PageSize>20</PageSize>
     <AllowSorting>true</AllowSorting>
     <JoinType>Group</JoinType>
     <PagingMode>Inbuilt</PagingMode>
     <Scope>Farm</Scope>
     <ReportColumns>
<ReportColumn>
               <GroupOperator>Key</GroupOperator>
               <SortExpression>CustomerName</SortExpression>
               <Sortable>true</Sortable>
               <Name>CustomerName</Name>
               <DisplayName>CustomerName</DisplayName>
               <DisplayType>Default</DisplayType>
               <IsTextColumn>true</IsTextColumn>
               <IsValueColumn>false</IsValueColumn>
          </ReportColumn>
          <ReportColumn>
               <GroupOperator>Key</GroupOperator>
               <SortExpression>Addrress</SortExpression>
               <Sortable>true</Sortable>
               <Name>Addrress</Name>
               <DisplayName>Addrress</DisplayName>
               <DisplayType>Default</DisplayType>
               <IsTextColumn>true</IsTextColumn>
               <IsValueColumn>false</IsValueColumn>
          </ReportColumn>
 <ReportColumn>
               <GroupOperator>Key</GroupOperator>
               <SortExpression>Amount</SortExpression>
               <Sortable>true</Sortable>
               <Name>Amount</Name>
               <DisplayName>Amount</DisplayName>
               <DisplayType>Defult</DisplayType>
               <IsTextColumn>false</IsTextColumn>
               <IsValueColumn>true</IsValueColumn>
          </ReportColumn>
          <ReportColumn>
               <GroupOperator>Key</GroupOperator>
               <SortExpression>Date</SortExpression>
               <Sortable>true</Sortable>
               <Name>Date</Name>
               <DisplayName>Date</DisplayName>
               <DisplayType>DateTime</DisplayType>
               <IsTextColumn>false</IsTextColumn>
               <IsValueColumn>true</IsValueColumn>
          </ReportColumn>
     </ReportColumns>
     </ReportDefinition>

·        Step 4. StoredProcedure created in the Nintex DB in SQL Server.

ALTER PROCEDURE GetAllCustomerDetails
      AS
BEGIN
      SET NOCOUNT ON;
      SELECT [CustomerName],
      [Addrress]
      ,[Amount]
      ,[Date]
  FROM [WSS_Content_NintexKidde].[dbo].[Customer]
  END
GO

Step 5. Add Custom report through Central Admin

Step 6.   After adding the report we can access it through the Workflow Reporting 


Wednesday, December 24, 2014

Inline Approval Function

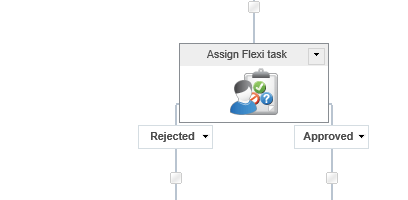
This is helpful you to work with InfoPath form approval for Approval task using Flexi task or request task actions.

1.       Create Web Service to get “SharePointTaskId”

·         Manage data connection à Addà Create a new connection à Receive data àSoap Web service à enter following link


·         Select “GetRunningWorkflowTasksForCurrentUser” à Next à Finish

2.       Create a web service to get Task ID and Outcome
·         Manage data connection à Addà Create a new connection à Receive data àSoap Web service à enter following link
·         Select “ProcessTaskResponse3” à Next


With Flexi Task Action :
·         Select “ProcessFlexiTaskResponse2” 


·         Put Task list name : eg -->“Personnel Requisition Workflow Tasks”

You have to configure Task Outcome values in InfoPath Form as “Approved” or “Rejected”

3.       Sumbit button function

·         Add rule for Disable Submit button


·         Add Sumbit rule  Ã 
·         Set field value for outcome : Set outcome form ProcessTaskResponse3/ProcessFlexiTaskResponse2 Web service.


·         Set Task ID : Set spTaskId form ProcessTaskResponse3/ProcessFlexiTaskResponse2 Web service.


·         Set SharePointTaskId form “GetRunningWorkflowTasksForCurrentUser” Web service.


·         Set Query Data


·         Set HasTask false :


·         Send Update


·         Finally Close the form action .

4.       Set Form Load function
·         Query by task  -Set fileUrl à to form variable


·         Set Query connection :


5.       Set Set hask task = true
·         Check condition FileUrl is not blank and  TaskType = "Approval"(for ProcessTaskResponse3) or TaskType = "MultiOutcome" (for ProcessFlexiTaskResponse2)

·         Set variables for task type


·         Set Has task variable = true()


6.       Error
·         If you are getting this kind of error check the web service links and verify


Workflow end configuration for Flexi Task.

<ProcessFlexiTaskResponse2 xmlns="http://nintex.com">
      <comments>string</comments>
      <outcome>string</outcome>
      <spTaskId>int</spTaskId>
      <taskListName>string</taskListName>
    </ProcessFlexiTaskResponse2>


Workflow end configuration for Request Approval Task. Please notify that you have to put below outcomes only.

<ProcessTaskResponse2 xmlns="http://nintex.com">
      <comments>string</comments>
      <outcome>None or Approved or Rejected or Pending or Cancelled or NotRequired or Continue or Delegated or Custom or OverrideApproved or OverrideRejected or OverrideContinue</outcome>
      <spTaskId>int</spTaskId>
      <taskListName>string</taskListName>
    </ProcessTaskResponse2>


Thursday, December 18, 2014

BCS: There are no addresses available for this application


I have a virtual machine (Windows 2008 R2) which I'm setting up for Sharepoint 2010 development.

I am trying to set up BCS.

In central administration, I have added a new service application of type (Business connectivity services), and this application is showing as "started".

When I click on the service in the list I receive the error "There are no addresses available for this application."


The problem occurs because Business Data Connectivity Service is stopped. To start BCS Service
Go to Central Administration --> Application Management --> Under Service Applications
Click Manage services on server. Start business data connectivity service.

Perform iis reset.

Wednesday, November 12, 2014

Reports on your Nintex Workflows

Nintex Workflow Reports webparts, available with the Enterprise versions of Nintex Workflow (2010/2013).

Accessing and Enabling the Nintex Reports


1. Open Central Administration and click on Manage Reports in the Nintex Workflow Management section. A list of the available reports will appear.
2. To enable a report, check the Enabled box.

To add a Workflow Reports Webpart to a site


Open the Site, click on Edit Page and then the Insert tab.
Web Part -> Categories -> Nintex Workflow 2010 (2013) -> Workflow Report Viewer
Now you can edit the webpart and select the Nintex report you wish to display.


Workflow Performance Reports


12 Month Usage Summary 
3 Month Usage Summary
30 Day Usage Summary 
Approver Performance Statistics
Completed Workflows
Errored Workflows 
Overdue Workflows 
Workflow Actions 
Workflow Performance 
Workflows by Site
Workflows in Progress 

Monday, October 27, 2014

Log4net quick learning

log4net


The greatest logging tools out there for .NET is log4net. It’s a tool to help the programmer output log statements to a variety of output targets. There are a three parts to log4net. 
•          Configuration -
•          Setup
•          Call


Logging Levels


1.         OFF - nothing gets logged (cannot be called)
2.         FATAL
3.         ERROR
4.         WARN
5.         INFO
6.         DEBUG
7.         ALL - everything gets logged (cannot be called)

These levels will be used multiple times, both in your code as well as in the config file. There are no set rules on what these levels represent (except the first and last).


Configuration


Configuration is doing in the app.config or web.config file.  There are a few pieces of information that need to be placed in the config file in order to make it work properly with log4net. These sections will tell log4net how to configure itself. The settings can be changed without re-compiling the application.
Root
You need to have one root section to house your top-level logger references. These are the loggers that inherit information from your base logger (root). The root section is the minimum level to log. 

<root>
      <level value="INFO"/>
      <appender-ref ref="RollingFileAppender"/>
    </root>


Additional Loggers


An additional logger that placed in config file to log to the console messages that occur inside the OtherClass class object:

<logger name="Log4NetTest.OtherClass">
      <level value="DEBUG"/>
      <appender-ref ref="ConsoleAppender"/>
    </logger>


ConfigSections


This section is to identify where the log4net configuration is housed.

<configSections>
    <section name="log4net" type="log4net.Config.Log4NetConfigurationSectionHandler, log4net"/>
  </configSections>


Appender (General)


It specifies where the information will be logged, how it will be logged, and under what circumstances the information will be logged. 

<appender name="ConsoleAppender" type="log4net.Appender.ConsoleAppender">

The Code


Once you have a reference to the log4net DLL in your application, there are three lines of code that you need to know about
1.         One-time entry that needs to be placed outside of your class. I usually put it right below my using statements in the Program.cs file.  Or 
[assembly: log4net.Config.XmlConfigurator(Watch = true)]
2.         It does a System.Reflection call to get the current class information. This is useful because it allows us to use this code all over but have the specific information passed into it in each class. 
3.         The actual call to log some piece of information.

log.Debug("Application started"); or  log.Info("Info error logging", ex);  …etc.

Download DLL , add reference to your Project and have a try !!!